Accounts / Users
Overview
Accounts provide the most granular level of resource ownership and user permissions within a domain. For example, instances are created and owned by an Account and count towards resources consumed for that Account. An Account is a container that can contain multiple users. Each user in an Account can see other users in that same Account but not users in other accounts. Each User in an Account also inherits the permissions of the Account itself.
It is possible to have multiple accounts per Domain, typically that have some logical relationship between them. Domains can have multiple sub-domains to provide delegation of access. In the example of a managed service provider (MSP), the MSP could create sub-domains for each of their customers. An Account that needs to be added to a specific Domain will have that Domain specified during Account Creation by the MSP.
Users are linked to an Account and provides access to resources within an Account. While most accounts will have a single user, multiple users can be added. There is no isolation between users in an Account, but users are isolated from users in other accounts in the same Domain. Usernames must be unique to a specific Domain, but the same Username can be used in separate Domains including sub-domains.
Logging into OpenCloud
When logging in to OpenCloud, the Domain and/or SubDomain must be specified on the OpenCloud login page to provide access for the customer Account. If the Customer is accessing a sub-domain Account, the full path must be provided (e.g., parent-domain/sub-domain). An example of this Domain path is shown below:
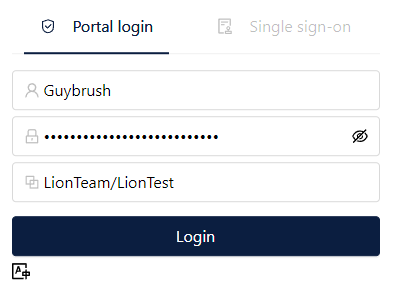
An initial Account & User will be provided by US Signal upon completion of the customer domain. There will be one "Cloud Domain Admin" Account to access the Domain. Additional sub-domains, accounts, and users can be created by the customer if required.
While accounts and users usually have the same name, accounts with multiple users must use their username to login to OpenCloud.
Accounts
View Account
- Select
Accountsfrom the left navigation menu. - Select the Account Name that should be viewed.
- The left information pane displays helpful information about the Account such as the domain, role, and status.
- The right information pane contains further details about the Account, including resource limits, Account-specific settings, and event logs.
Add Account
- First, an Account needs to have Domain Admin Privileges to add any additional accounts.
- From the main OpenCloud menu, select
Accountsfrom the left navigation menu. - Select
Add Accountat the top of the screen and fill out the following items:
| Field | Required or Optional |
|---|---|
| Role | Required for Account Creation |
| Username | Required for Account Creation |
| Password | Required for Account Creation |
| Required for Account Creation | |
| First and Last Name | Required for Account Creation |
| Domain | Required for Account Creation |
| Account Name | Optional. Account Name can be the same as the Username |
| TimeZone | Optional. Select the local timezone for the Account |
- Please be aware that customers will only be allowed to add new accounts to their domains and sub-domains. If no separate Account Name is specified, the Username will be the Account name as well.
Delete Account
All resources within the Account and its users will be deleted, so use with caution. US Signal cannot restore Instances, Volumes, and Snapshots that are deleted along with an Account.
- Select
Accountsfrom the left navigation menu. - Select the Account Name that should be Deleted.
- Select the red
Delete Accountbutton on the far right hand side of the Account functions menu. - A dialog box will ask for confirmation that the Account should be deleted. Confirm this by entering the account name in the text field. Click OK to proceed.
Note
- Account must be disabled prior to deletion. When an Account is disabled all Users will lose access to their cloud resources. All running Instances will be shut down immediately.
- Deleting an account will delete all Instances, Volumes, and Snapshots associated with the account.
Change Account
If an Account created by a customer requires a role change, the default account that was provided (Cloud Domain Admin) can modify the role. The account name can also be changed.
- Select
Accountsfrom the left navigation menu. - Select the Account that should be changed
- Inside the Account, select the
Edit Accountbutton. - Change to the desired role and/or account name.
Available Roles
The following Roles are available.
| Role Name | Description |
|---|---|
| Cloud Domain Admin | This is the default permission scheme on the account This permission can only be assigned to the account that is initially provisioned |
| Cloud Admin | User Role that does not have the ability to create/modify/delete Accounts and Users/create/modify/delete self-provisioned networks |
| Cloud Support | User Role that can start/stop/restart VMs and attach ISOs Only |
| Cloud Read-Only | User Role that has Read-Only Access |
Account Information
OpenCloud Resources resources are assigned to Accounts. An Account can have many Users under it. The key concept is that permissions are applied at the account level. So all users under that account will inherit those permissions.
View Resource Limits
- Select
Accountsfrom the left navigation menu. - Select the Account Name to enter into the Account details.
- Select the
Limitstab to see the current Account Limits as well as the amount currently in use.
Resource Limit value of -1 is unlimited
Change Resource Limits
- Select
Accountsfrom the left navigation menu. - Select the Account Name that should have Resource Limits changed.
- Select
Configure Limitsfrom the right side menu. - The following Resource Limits are configurable on an Account:
| Resource Limit | Definition |
|---|---|
| Maximum User Instances | The number of Instances, or VMs, that an Account can have running at one time. |
| Maximum Public IPs | The number of Public IPs that an Account can have. |
| Maximum Volumes | The number of Volumes, or disks, that an Account can have active. |
| Maximum Snapshots | The number of Instance and Volume Snapshots that the Account can make and control. |
| Maximum Templates | The number of Instance creation Templates that the Account can create and own. |
| Maximum Networks | The number of Networks, Shared or otherwise, that the Account can own. |
| Maximum VPCs | This feature is currently not implemented in OpenCloud. |
| Maximum CPU Cores | The maximum amount of CPU Cores that the Account can use for Instances. |
| Maximum Memory in MB | The maximum amount of RAM that that an Account can use for Instances. |
| Maximum Primary Storage | The maximum amount of Primary Storage that the Domain can assign to Instances. (Instance Volumes and Instance snapshots) |
| Maximum Secondary Storage | The maximum amount of Secondary Storage that the Domain can assign to Instances. (Templates, ISO, Volume Images, and Volume Snapshots) |
Resource Limit value of -1 is unlimited
The Account provided as part of your order has unlimited resources set by default. MSP Customers may wish to restrict resources for other accounts/sub-domains. The account with Cloud Domain Admin that will be needed to add more Resources to each specific Account.
Disable/Enable Account
A disabled Account cannot perform any actions in the OpenCloud platform. The instances associated with that Account will be immediately powered down. Customers perform this action at their own risk.
- Select
Accountsfrom the left navigation menu. - Select the Account Name that should be Disabled.
- Inside an Account, select the
Disable Accountbutton on the Account functions menu in the upper right hand side of the screen. - Once the Account is disabled, the Account status indicator will show the Account as Disabled.
- To re-enable the Account, Select the
Enable Accountbutton on the Account menu.
Lock/Unlock Account
- Select
Accountsfrom the left navigation menu. - Inside the Account:
- To lock the Account, click
Lock Accountbutton on the Account functions menu in the upper right hand side of the screen. - To unlock the Account, click
Unlock Accountbutton in the same area.
- To lock the Account, click
Locking an Account prevents associated users from accessing or performing any tasks in OpenCloud. This does not stop any running instances associated with the Account. Accounts must remain in an enabled state to be locked.
Users
List Users
- Select
Accountsand then click into the Account that owns the username in question. - Once inside the Account, Select
View Usersat the bottom of the Account information box on the left. - The list of users in this Account will appear. Click into whatever User needs to be edited.
- The specific User details screen will appear. The User can then have changes made to it.
Add User
- An Account can have multiple users underneath it that share that specific account's roles. Customers should be aware that if they make a new User under an Account that has a Domain Admin role, that new user will also have a Domain Admin role.
- Select the
Accountstab on the left hand side of the screen, then click into the Account in question. - Select
View Usersunder the Account information area. - The list of users under this Account will come up. Select
Add Userat the top in blue. - A new User Configuration screen will come up. Fill out all the information boxes on this screen and then click OK to make the new User.
- The new User will be created under the specified Account and then inherit the Account's permissions.
Edit User
- Select the
Accountstab on the left hand side of the screen, then click into the Account in question. - Select
View Usersunder the Account information area. - Select the name of the User that should be edited.
- Select the
Editbutton At the top right of the screen. - A new window will open to show the current User details. Change the details as needed and click ok.
- The user Account will then update to reflect the new changes.
Delete User
- Select the
Accountstab on the left hand side of the screen, then click into the Account that contains the User in question. - Select
View Usersunder the Account information area. - Click into the User that needs to be deleted.
- Once inside the User main screen, click on the red
Delete Userbutton in the upper right. - A dialog box will appear asking for confirmation that the user should be deleted.
- Clicking OK removes the User.
Change Password
- Select
Accountsfrom the left-hand panel on the main page. - Click into the Account that contains the user.
- Click into the specific user.
- Once inside the user screen, Select the
Change passwordbutton in the upper right. - A new window will open. Fill out the new User password and confirm it. Then click OK.
API Keys
- Accounts or Users who will be given access to the API will need API and secret keys generated for them.
- Select the
Accountstab on the left hand side of the screen, then click into the Account that contains the User in question. - Select
View Usersunder the Account information area. - Select the name of the User that needs an SSH key.
- Once inside the user screen, click on the
Generate New API/Secret Keysbutton in the upper right. - A dialog box will appear asking the customer to confirm that new Secret and API keys will be generated.
- Once these are generated, they will be seen at the bottom of the user's page.
Disable/Enable User
- Select the
Accountstab on the left hand side of the screen, then click into the Account that contains the User in question. - Select
View Usersunder the Account information area. - Click into the User that needs to be disabled.
- Once on the main user page, click on the
Disable Userbutton in the upper right menu to disable the user. - Once clicked, a dialog box will appear to confirm that the user should be disabled.
- The user will then be disabled after OK is clicked.
- To Enable a User, click on the
Enable Userbutton.
Disabling a user prevents that specific user from performing any other actions in OpenCloud. Since an Account may have multiple users, this disable only applies to the specific User in an Account.