Compute
Instances
In OpenCloud, an Instance is a collection of Compute and Storage Resources. Instance Compute and Volumes are separated because there are unique actions that can be taken on each part.
- Instance Compute information is located on the
Compute > InstancesTab. - Volumes that are attached to the Instance are located on the
Storage > VolumesTab. - There are other ways of viewing the Instance Volumes from inside the Instance details screen.
The Instance list includes an Arch column showing the CPU architecture of each Instance (x86_64 for standard Intel/AMD instances, aarch64 for ARM64 instances).
It is highly recommended that all Windows and Linux Instances install qemu-guest-agent as part of the initial OS configuration process. This agent provides more robust monitoring and reporting of Instance metrics in OpenCloud as well as provides the Instance Snapshot functionality to Windows and Linux Instances. For Windows, this guest agent is part of the VirtIO Tools install. Linux users will need to determine what version is needed for their flavor of Linux.
Overview
Instance Lifecycle
Instances can be in the following states:
| Permanent | Temporary |
|---|---|
|
|
Creating Instances
- In OpenCloud, click on
Compute > Instances. - Select the
Add Instance button at the top of the screen.
 - A new window will open.
-
Select the Zone for the Instance.
Available Zones in OpenCloud
Zone Description us-mi-abh-01 MI05 - Auburn Hills, Michigan us-co-eng-01 CO01 - Denver, Colorado us-ia-dsm-01 IA01 - Des Moines, Iowa us-mi-kwd-01 MI01 - Grand Rapids, Michigan -
Select either the Template or ISO heading to view a list of Templates or ISOs that are available.
An architecture selector will appear at the top of the Template/ISO list. Select the architecture that matches your workload:
Architecture Description AMD 64 bits (x86_64) Standard x86-64 Instances. Available in all zones. ARM 64 bits (aarch64) ARM64 Instances. Available in us-mi-abh-01andus-co-eng-01only. Linux only — Windows is not supported or permitted on ARM 64 (aarch64).Drivers
Instances Templates may need drivers installed. Please refer to the VirtIO Driver details.
-
Choose a Compute offering for the Instance. Depending on the type of Instance and what purpose it will serve, choose an offering that makes sense and/or follows best practices — see Compute Offerings for the full naming convention and offering types. The CPU and RAM for each Offering will be displayed next to the Offering name.
- The default ROOT disk size depends on the Template selected — for example, Windows SPLA Templates default to a 30 GB ROOT disk. The default size is shown below the Compute Offering selection box and can be resized after Instance creation. There is also an option to
Override Root Disk Sizeto create a larger ROOT disk during Instance creation if desired. - Select whether a DATA disk should be attached to the Instance. This first DATA disk is a separate disk that can be the start of a new data storage Volume if needed. There is also an option to forgo adding an additional DATA disk during Instance creation.
-
To add a Custom Data Disk, select
Customand specify the Disk Size in GB in the box below.Limits
Each volume has a max size of 5,000 GB
-
Select the network that should be assigned to the Instance. An IP address will be provided via DHCP or an address that's within the subnet's range can be specifically assigned.
-
Selecting an SSH Key Pair is optional.
Note
See How-To on SSH Keys for more information on this feature.
-
At the bottom, there is an option labeled
Advanced Mode. Click on the toggle button to show more options.-
There is a choice of traditional BIOS booting or the more secure UEFI booting. If creating an Instance from a Template, the Template's specific boot method will already be selected.
Warning
Setting the Instance to UEFI or BIOS during creation is important — it cannot be changed afterwards. UEFI is required for Windows 11 and some other OS configurations. UEFI is required for Instances using vTPM. Secure boot mode is recommended but not required.
-
Dynamic scaling will be disabled by default and should not be toggled on.
-
If there are Affinity Groups created already, this new Instance can be added to these groups under the Advanced Mode Options. If not, this part can be left blank. Please refer to the Affinity Groups section for more information.
-
-
The last portion of the Instance creation is the area for the name of the Instance. It is strongly recommended to provide a friendly name for the instance here as it will help with identification.
Character Limit
Instance name can only contain ASCII letters 'a' through 'z', the digits '0' through '9', and the hyphen ('-'), must be between 1 and 63 characters long, and can't start or end with "-" and can't start with digit
-
After filling out all the information, click
Launch Instance. The screen will revert to the main Instances window. - Click on the Instance name in the
Instancesscreen to go into the Instance details. - The list of details in the right window on the Instance details screen can be clicked on such as
NICs,Volumes, andSnapshots.
Accessing the Console
- The Instance Console allows for direct access the Instance OS.
- The Console can be accessed by clicking the
View Console button.
 - The Console should load in a new browser tab and will show the OS screen of the VM. Mouse and Keyboard access will be automatically accessible.
- The menu bar of the Console, which is on the left-hand side of the Console screen hidden behind a small tab, contains extra features that can be used with the Console.
- The Top option button, represented by an "A" key, contains extra keys that can be selected to send that key, along with others, to the Console screen.
- The middle option is a clipboard that can be used to send text directly to whatever empty textbox is selected in the OS.
- The bottom option can expand the screen so that the OS window takes up more of the window.
Attaching an ISO
Instances can have ISOs attached. The ISO must be uploaded to OpenCloud before it can be attached.
- In OpenCloud, click on
Compute>Instances. - Click on the name of the Instance that needs an ISO mounted to go into the Instance details.
- At the top right, click on the
Attach ISO button.
 - This will bring up a dropdown menu of ISOs to select. Choose the correct one and then click OK.
- The ISO will be attached to the OS using whatever Optical Drive is installed on the OS. Most if not all Templates include an Optical Drive but attaching an ISO should push one down to the Instance if it is missing.
- ISOs can also be unattached from the Instance in the same way. Click on the same button to un-attach the ISO.
VirtIO Drivers
- The US Signal OpenCloud Templates that are used for Instance creation contain the OpenCloud VirtIO drivers by default, but there may be times when these drivers will need to be installed manually on an Instance. These drivers, much like the VMware Tools drivers, allow for imported Instances to use the best type of OpenCloud disk adapters and vNICs.
- If a custom Windows ISO is uploaded to create an Instance, the VirtIO drivers will need to be added to the Windows Installer through the Instance before the Windows Install can continue.
- To make sure that the VirtIO drivers are added to a Instance make sure that the Instance is assigned the “Windows PV” OS type in OpenCloud. Once the Instance is made and the Windows software starts the installation process, there may be a point where Windows cannot find the specific disks to install onto.
- At this point, the Windows ISO must be detached from the Instance and the VirtIO drivers attached.
- Go to the Instance details page and select the
Detach ISO option from the top right.
 - This will detach the Windows ISO from the Instance after hitting OK in the dialog box.
- Then, go to the same spot and select
Mount ISO. - Select the VirtIO driver ISO to mount. It will be named
VirtIO Windows Driversand will be present in the ISO selection screen. After this ISO has been mounted, switch back to Windows Install and browse for the proper disk drivers. These will be in the following place: viostor/'windows version'/amd64. - Once these drivers are added to the Windows Installer, unmount the VirtIO ISO and switch back to the Windows ISO using the same unmount and mount functions.
- The disk that can be used to install Windows should be visible on the install page, and the process can continue.
- If an existing Windows Machine needs the VirtIO drivers installed, attach the VirtIO ISO and run the following executable:
- Virtio-win-guest-tools
- This installer will provide the drivers required to use the full feature suite of OpenCloud.
Adding Settings
Instance Settings allow low-level configuration options to be applied. Settings can only be added or changed when the Instance is stopped.
Settings differ by CPU architecture — see the appropriate section below for your Instance type.
AMD 64 (x86_64) Instances
Recommended Settings
These settings should be applied to all AMD 64 (x86_64) Instances for optimal performance.
| Setting | Values | Description |
|---|---|---|
nicAdapter |
virtio |
Defines the NIC adapter used for the Instance. virtio is recommended for all cases. Other supported values: e1000, rtl8139, vmxnet3, ne2k_pci. If not set, virtio is preferred. |
UEFI |
LEGACY, SECURE |
Specifies the boot method. SECURE is recommended and required for Secure Boot. LEGACY uses standard UEFI without Secure Boot. Not having this setting present is equivalent to BIOS boot. This setting cannot be changed after the Instance is created — if a change is needed, create a new Instance and migrate data. |
video.hardware |
virtio |
Enables VirtIO display drivers, allowing resolution changes within the Instance OS. Without this setting, the maximum OS resolution is limited to 800×600. |
rootDiskController |
virtio |
Enables VirtIO SCSI disk controllers. |
Optional Settings
| Setting | Values | Description |
|---|---|---|
cpu.corespersocket |
<integer> |
Defines the number of VM CPU cores per physical socket. |
virtual.tpm.version |
2.0, 1.2 |
Enables a virtual TPM (vTPM). 2.0 is the default and recommended version. 1.2 is not supported with the tpm-crb model. |
virtual.tpm.model |
tpm-tis, tpm-crb |
Sets the TPM model. tpm-tis (TPM Interface Specification) supports both TPM versions. tpm-crb (Command-Response Buffer) does not support version 1.2. |
vTPM — Recommended Configuration
For most use cases, set virtual.tpm.version=2.0 and virtual.tpm.model=tpm-tis. The Instance boot type must be set to UEFI when using vTPM. SECURE boot mode is recommended but not required — vTPM is compatible with both LEGACY and SECURE UEFI.
Desktop OS licensing (such as Windows 10/11) is not covered under US Signal's SPLA agreement.
ARM 64 (aarch64) Instances
ARM 64 (aarch64) Instances use a different CPU architecture than AMD 64 (x86_64). UEFI is always active on ARM 64 (aarch64) hardware — there is no BIOS fallback. All AMD 64 (x86_64) Recommended and Optional Settings apply to ARM 64 (aarch64) Instances with the following exceptions and additions.
Do not set UEFI on ARM 64 (aarch64) Instances
Setting UEFI to LEGACY or SECURE on an ARM 64 (aarch64) Instance will cause it to fail to boot.
Secure Boot not supported on ARM 64 (aarch64)
Secure Boot is not currently supported on ARM 64 (aarch64) Instances.
| Setting | Values | Notes |
|---|---|---|
video.hardware |
virtio |
Required on ARM64. Without this setting, the console will show nothing while the Instance is booting. |
rootDiskController |
virtio |
Some live Linux installers fail to boot with the disk with virtio. If an installer boots but cannot find the disk, set this to scsi. |
Steps
- Click on
Compute>Instancesand click on the Instance. - Click on the
Stop Instance button to stop the Instance.
 -
Once stopped, click on
Settings.
-
Click on the
Namebox, type the setting name, then type the value in theValuebox.
-
Click the Check Mark to add the Setting.

-
Repeat for any additional Settings, then start the Instance again using the
Start Instance button.
How to Enable vTPM
A virtual Trusted Platform Module (vTPM) allows Instances to use TPM-dependent features and other security requirements. vTPM is enabled by adding Instance Settings while the Instance is stopped.
UEFI Required
vTPM requires the Instance boot type to be set to UEFI. Boot type is set during Instance creation and cannot be changed afterwards. If an existing Instance is using BIOS boot, a new Instance must be created with UEFI boot before vTPM can be enabled.
Steps
- In OpenCloud, click on
Compute>Instances. - Stop the Instance using the
Stop Instance button. -
Once stopped, click on
Settings, then add the following settings:Setting Value virtual.tpm.version2.0virtual.tpm.modeltpm-tisAdd each setting by typing the name in the
Namebox, the value in theValuebox, and clicking the check mark to save. -
Start the Instance again using the
Start Instance button. - The vTPM device will be visible to the OS on next boot. For Windows instances, the TPM can be verified in Device Manager or by running
tpm.msc.
Info
tpm-tis (TPM Interface Specification) is recommended for most use cases and supports both TPM version 1.2 and 2.0. tpm-crb (Command-Response Buffer) is an alternative but does not support version 1.2. See Adding Settings for the full settings reference.
Attaching Additional Networks
OpenCloud allows Instances to have multiple Networks attached to them. It is possible for an Instance to belong to multiple networks in OpenCloud.
- In OpenCloud, click on
Compute>Instances. - Click onto the Instance name to enter the Instance details screen.
- From this screen, click on the NICs tab.
- To add an additional NIC, click on the
Add Network to Instancebutton. - A dialog box will open. Select the Network in question from the drop-down menu.
- An additional NIC with a unique MAC address will be attached to the instance. This action will also create a new vNIC inside the OS of the Instance.
- From this same NICs tab, NICS can be removed from Instances or set the Default NIC for the Instance.
- Click on the small
+next to the NIC's Device ID. It will expand the NIC and show its details along with option buttons. - There will be a button to set the selected NIC as Default, which means that it can never be deleted from the Instance and will always be assigned.
- There are also options to change the NIC IP settings if necessary.
- The red trashcan button will delete the NIC. Only non-Default NICs can be deleted. To delete an old Default NIC that is no longer needed, an additional NIC will need to be added and assigned as the Default for the Instance.
If the Instance OS does not support hot-add of NICs, a reboot may be required.
Changing a Network
It is not possible to change the network attached to a NIC. A 2nd NIC will need to be added and swapped.
- In OpenCloud, click on
Compute>Instances. - Click onto the Instance name to enter the Instance details screen.
- From this screen, click on the NICs tab.
- Add an additional NIC, click on the
Add Network to Instancebutton. - Choose the new network and click
OK - Click the + sign next to new NIC to expand the details (Device ID will be higher than 0).
- Click the icon that looks like a checkmark with a box around it (hovering over you will see
Set default NIC) and chooseYeswhen prompted. - The NIC ordering will change and your new network should now be now Device 0.
- Click the + sign next to old NIC to expand the details (Device ID will be higher than 0).
- Click the Red Trash Can icon to remove the old NIC
If the Instance OS does not support hot-add of NICs, a reboot may be required.
The above steps assume the Instance only has 1 NIC. Steps will change slightly if you have multiple NICs already
Stopping and Starting
Instances can be stopped or started from the Instance details menu. Stopping an Instance will shut the Instance down and Starting an Instance will power the Instance back on.
- In OpenCloud, click on
Compute > Instances. - Click on the Instance name to enter into the details of the Instance.
- Select
Stop Instance from the options in the upper right of the screen. - A dialog box will pop up. There is no need to force the Instance to stop unless it did not respond to previous attempts at stopping. Click OK.
- The Instance will then be stopped.
- To start the Instance again, click on the
Start Instance button.
Stopping Instances from Guest
Stopping instances should be performed from the OpenCloud UI. If an instance is shutdown from within the OS, the HA (High Availability) process will automatically restart the instance.
Reboot an Instance
- In OpenCloud, click on
Computeand thenInstances. -
Select the Instance to be rebooted and then select the button that says
Reboot Instancein the upper right corner.
-
Confirm the reboot by clicking OK. The Instance will be rebooted, and an event will be generated in the tasks.
Deleting/Destroying
Note
Once an Instance is deleted, or expunged, it can no longer be recovered. US Signal is also unable to recover deleted Instances.
- To totally remove an Instance and free up its resources, an Instance must be Destroyed AND Expunged in OpenCloud.
- Once executing the option to Destroy an instance, it is set in the
DestroyedState and its Volumes will be retained for 24 hours, keeping the allocated Storage and Compute resources in use. During this time, the Instance can be restored by performing aRestoreaction. - After 24 hours, the Instance and its Volumes are automatically removed. This process deletes the attached Data Volumes and releases all other resources. After this process occurs, US Signal cannot recover an Instance.
- If needed, there is an option to
Expungein theDestroy Instanceconfirmation screen. This will free up the Storage. - To perform either a Destroy or Expunge operation, go to
Computeand thenInstances. - Click on the Instance Name in question and enter its details page.
- Select the Red Trashcan
Destroy Instance button in the upper right corner.
 - A confirmation dialog box will appear. To remove the Instance immediately, select the
Expungeoption. -
To delete the associated Data Volumes that are attached to the Instance, the Data Volume names will need to be populated in the
Data Volumes to be Deletedbox. Otherwise, the Data Volumes will not be removed along with the Instance and Root Volume.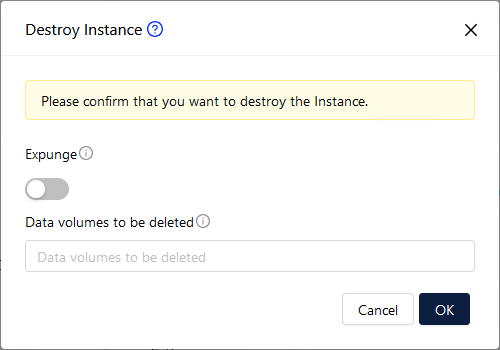
-
The
Expungeoption will immediately delete the Instance and all of its Root and Data Volumes as long as it is specified in theData Volumes to be Deletedbox. US Signal cannot recover any of this data. - To recover a
DestroyedInstance that has NOT been Expunged, click on the Instance name from the list of Instances to go into its details. - Select
Recover Instancefrom the options in the upper right corner. - The Instance will then be recovered in a stopped state and can be powered on again.
Scaling Resources
All Instances in OpenCloud are assigned their resources through what is called a Compute Offering. These are standardized Instance resource builds that define specific CPU and RAM allotments for Instances. These Compute Offerings can range from the small to the exceptionally large.
- To see the list of Compute Offerings that are available, go to
Service Offerings, >Compute Offerings. - The list here will be the Compute Offerings that are available to Instances.
- To change what Computer Offering is assigned to an Instance, first go to
Compute>Instances. - At the bottom of the Instance information box on the left-hand side, the current Compute Offering that is assigned to the Instance is listed.
- To change the Instance Compute Offering, the Instance must be stopped first.
-
Once the Instance is stopped, select the
Scale Instanceoption in the upper right corner of the screen.
-
A dialog box will appear with other Compute Offering choices. Select the new choice and then click Ok.
- The process will complete and then the Instance can be started again. Check that its details reflect the newly assigned Compute Offering.
Switching between S/CD and MP/MD Offerings
Due to the way OpenCloud infrastructure is organized, Standard (S) and Compute Dense (CD) offerings run on different hardware than Memory Plus (MP) and Memory Dense (MD) offerings. Switching directly between these tiers is not supported.
To move between tiers, use the Change-Service-Offering offering as an intermediate step:
- Stop the Instance.
- Scale to
Change-Service-Offering. - Scale again to the target offering (e.g., an
MPorMDoffering). - Start the Instance.
This two-step process allows the Instance to move to the correct underlying infrastructure for the new offering type.
Edit Instance
Instance names, OS types, and the Group that they belong to can be changed after an Instance is created.
- In OpenCloud, click on
Computeand thenInstances - Click on the name of the Instance to be changed.
-
Inside the Instance details screen, click on
Edit Instancein the upper right-hand corner of the screen.
-
A new screen will appear. The Name of the Instance will be what is reflected in the OpenCloud GUI. The Display Name of the Instance will be what is represented inside the specific Instance's detail screen. Change these to the required Values.
- The OS Type of the Instance does matter when dealing with Windows Instances. All Windows Instances should be assigned the
Windows PVOS type as this designation will allow the Instance to use the best available drivers for OpenCloud. The OS type can be changed after the Instance is created. It is recommended to stop and start the Instance after the OS type is changed. - If specific Instances need to be assigned to Security Groups within OpenCloud, this screen is also where that Group will be configured. If there are no Security Groups to assign, this space can be left blank.
Viewing Instance Metrics
OpenCloud provides detailed descriptions of CPU, Memory, Disk, and Network usage.
- In OpenCloud, click on
Computeand thenInstances. - Click on the name of the Instance to view.
- On the right window of the Instance screen, click on
Metricsto see various hourly views of the specific Instance statistics. - The different Resources have explanations next to them in small grey circles that explain what exactly OpenCloud is recording. These statistics can assist when diagnosing Instance performance issues.
Assign an Instance
Instances can be assigned to different Accounts in the Domain or reassigned to another account within a sub-domain.
- In OpenCloud, click on
Computeand thenInstances. - Click on the name of the Instance to be moved.
-
Click on the
Assign Instance to another Account button.
Instance must be stopped before the
Assign Instance to another Accountbutton appears. -
Fill in the dialog box with the required values:
Field Name Input Required/Optional Account type Leave this as Account. Projects are not used in OpenCloud Required Domain Set the domain. Required Account Set the account. Required Network Set the Network. Isolated networks are not used in OpenCloud. Required -
Once all of these options are filled out, click Submit. The Instance will then be moved to the new Account/User and Domain.
Requirements for Reassigning Instances
- Instances with Instance Snapshots or Volume Snapshots cannot be assigned to other accounts without first removing the snapshots.
- Instances must be stopped.
- Attached ISOs need to be unmounted.
Instance Delete Protection
Delete Protection prevents an Instance from being accidentally destroyed. When enabled, the Destroy Instance action is blocked until protection is explicitly disabled.
Enable Delete Protection
- In OpenCloud, click on
Computeand thenInstances. - Click on the Instance name to enter its details.
- Click the
Edit Instancebutton in the upper right. - Enable the
Delete Protectiontoggle and clickOK.
Disable Delete Protection
To destroy a protected Instance, delete protection must be removed first.
- In OpenCloud, click on
Computeand thenInstances. - Click on the Instance name to enter its details.
- Click the
Edit Instancebutton in the upper right. - Disable the
Delete Protectiontoggle and clickOK. - The Instance can now be destroyed normally.
Reset UserData
- In OpenCloud, click on
Computeand thenInstances. - Make sure the instance is powered off.
- Click on
Reset Userdata on InstanceIcon. - Change the
Userdata overrideslider to Enabled. - Choose either:
Stored Userdata- These are created underInstances-->User DataManual Userdata Entry- You can also manually provide the userdata if needed.
- Click Ok
Feature Availability
This feature is only available when using OpenCloud's Network - Services offering. See Network Offerings
Reset SSH Key
- In OpenCloud, click on
Computeand thenInstances. - Make sure the instance is powered off.
- Click on
Reset SSH key pairIcon. - Select the SSH key you would like to reset the instance with
- Click Ok
Feature Availability
This feature is only available when using OpenCloud's Network - Services offering. See Network Offerings
Compute Offerings
Compute offerings provide standardized Instance sizes. Each offering is named using the following convention:
<Type>-<CPU>-<Cores>-<RAM>
Example: S-I-4-8 = Standard, Intel, 4 vCPUs, 8 GB RAM
Offering Types
| Type | Name | Description |
|---|---|---|
S |
Standard | General-purpose balance of CPU and memory. Suitable for most workloads. |
CD |
Compute Dense | Higher vCPU-to-RAM ratio. Suited for CPU-intensive workloads. |
MP |
Memory Plus | Higher RAM-to-vCPU ratio. Suited for memory-intensive workloads. |
MD |
Memory Dense | Highest RAM-to-vCPU ratio. Suited for large in-memory workloads. |
CPU Types
| CPU | Processor | Architecture |
|---|---|---|
I |
Intel | x86_64 |
A |
AMD | x86_64 |
R |
ARM | aarch64 |
Zone Availability
CPU architecture and offering type availability vary by zone.
CPU Architecture
| us-mi-abh-01 | us-co-eng-01 | us-ia-dsm-01 | us-mi-kwd-01 | |
|---|---|---|---|---|
| Intel (x86_64) |  |
|
 |
|
| AMD (x86_64) | |
|
|
|
| ARM64 (aarch64) | |
|
|
|
Offering Types
| us-mi-abh-01 | us-co-eng-01 | us-ia-dsm-01 | us-mi-kwd-01 | |
|---|---|---|---|---|
Standard (S) |
|
|
|
|
Compute Dense (CD) |
|
|
|
|
Memory Plus (MP) |
|
|
|
|
Memory Dense (MD) |
|
|
|
|
Zone-specific availability
- ARM 64 (aarch64) is available in
us-mi-abh-01andus-co-eng-01only. ARM 64 (aarch64) Instances support Linux only — Windows is not supported or permitted. MPandMDoffering types are only available in Intel-based zones (us-mi-abh-01andus-co-eng-01) — not available in AMD-based zones or on ARM 64 (aarch64).
Instance Snapshots
Information for Instance Snapshots can be found here: Instance Snapshots
SSH Key Pairs
OpenCloud supports the use of SSH keys to log into instances for additional security. SSH Keys are unique to each user, and one user connecting to another user's instance cannot log in unless they share their SSH key files.
Create SSH Key
- In OpenCloud, click on
Computeand then click onInstancesand then click onSSH Key Pairs - Click on
Create a SSH Key Pair - Fill in the
NameField (Required) -
If needed enter the
Public Key(Optional)Note
If public key is set, OpenCloud will register the public key. If nothing is set, OpenCloud will create a new SSH key pair.
-
If needed change the
Domaindropdown (Optional) - Click
Ok
Feature Availability
This feature is only available when using OpenCloud's Network - Services offering. See Network Offerings
User-Data and Meta-Data
Feature Availability
User-Data and Meta-Data are only available when using a Network - Services offering. See Network Offerings.
Userdata is a block of content passed to an Instance at boot time. It is most commonly used with cloud-init to automate first-boot configuration — creating users, installing packages, writing files, or running scripts — without any manual interaction.
Metadata is read-only information about the Instance itself (IP address, hostname, instance ID, etc.) that is accessible from within the running OS via a well-known HTTP endpoint.
Registering Userdata
- In OpenCloud, click on
Computeand thenUser Data. - Click on
Register a Userdata at the top of the page.
 - A new window will open. Enter the Name, Plain Userdata content, Userdata Parameters, the Domain for the Userdata, and an optional Account.
Note
- Userdata content length can be up to 32 KB.
- Once a Userdata entry is created it cannot be edited. Create a new entry if changes are needed.
- Userdata can be attached to an Instance during creation under
Advanced Mode, or reset on an existing stopped Instance usingReset Userdata on Instance. - Userdata can be pre-linked to a Template or ISO using the
UserDatatoTemplateAPI. - If Userdata contains variables, declare them in the
Userdata Parametersfield. Do not declare parameters for built-in metadata keys such aspublic_hostname.
Userdata Examples
Userdata is delivered to the Instance as-is. The most common format is a cloud-init cloud-config document (YAML), identified by the #cloud-config header. A plain shell script (starting with #!/bin/bash) is also supported.
Example: Install packages and set hostname
#cloud-config
hostname: web-server-01
package_update: true
packages:
  - nginx
  - curl
  - git
runcmd:
  - systemctl enable nginx
  - systemctl start nginx
Example: Create a user with sudo access and an SSH key
#cloud-config
users:
  - name: deploy
    groups: sudo
    shell: /bin/bash
    sudo: ['ALL=(ALL) NOPASSWD:ALL']
    ssh_authorized_keys:
      - ssh-rsa AAAAB3NzaC1yc2EAAAADAQABAAAB... [email protected]
Example: Write a file and run a script on first boot
#cloud-config
write_files:
  - path: /etc/myapp/config.ini
    content: |
      [settings]
      env=production
      debug=false
    owner: root:root
    permissions: '0644'
runcmd:
  - /usr/local/bin/setup.sh
Example: Shell script
#!/bin/bash
apt-get update -y
apt-get install -y apache2
systemctl enable apache2
systemctl start apache2
echo "Deployed on $(hostname)" > /var/www/html/index.html
Example: Windows (Cloudbase-Init)
On Windows Instances, Cloudbase-Init is the equivalent of cloud-init. It reads Userdata at first boot and executes it based on the content type.
Cloudbase-Init must be installed in the template
Cloudbase-Init is included in US Signal-provided Windows templates. If using a custom Windows template, Cloudbase-Init must be installed before Userdata will be processed.
PowerShell script — the most common format. Use the #ps1_sysnative header to ensure the script runs in 64-bit PowerShell:
#ps1_sysnative

# Rename the computer
Rename-Computer -NewName "web-server-01" -Force

# Create a local administrator account
$Password = ConvertTo-SecureString "ChangeMe123!" -AsPlainText -Force
New-LocalUser -Name "deploy" -Password $Password -FullName "Deploy User" -Description "Deployment account"
Add-LocalGroupMember -Group "Administrators" -Member "deploy"

# Install IIS
Install-WindowsFeature -Name Web-Server -IncludeManagementTools

# Write a default page
Set-Content -Path "C:\inetpub\wwwroot\index.html" -Value "<h1>Deployed via Userdata</h1>"
Batch script — use the rem cmd header for .bat-style scripts:
rem cmd
net user deploy ChangeMe123! /add
net localgroup Administrators deploy /add
Warning
Avoid hardcoding passwords in Userdata. Use Userdata variables or a secrets management solution to inject credentials at deploy time.
Accessing Meta-Data from Inside an Instance
OpenCloud exposes instance metadata via a local HTTP endpoint accessible from within the Instance OS. This is compatible with the AWS EC2 metadata service format.
Metadata endpoint:
http://169.254.169.254/latest/meta-data/
Common metadata keys:
| Path | Description |
|---|---|
instance-id |
The unique Instance ID |
hostname |
The Instance hostname as known to OpenCloud |
local-ipv4 |
The primary private IP address of the Instance |
public-ipv4 |
The public IP address (if assigned) |
public-keys/ |
Registered SSH public keys |
service-offering |
The compute offering name |
availability-zone |
The zone the Instance is deployed in |
Example — retrieve the instance ID from inside a Linux Instance:
curl http://169.254.169.254/latest/meta-data/instance-id
Example — retrieve all available metadata keys:
curl http://169.254.169.254/latest/meta-data/
Note
Metadata is only accessible from within the Instance itself and only on Network - Services networks. It is not accessible externally.
Affinity Groups
Affinity Groups enforce instances to run on the same host or different hosts in the underlying infrastructure. This feature allows Users to specify the affinity group to which an Instance should belong and operate under.
- Instances with an “Anti-Affinity” group will not live on the same host.
- Instances with an “Affinity” group will live on the same host.
Affinity Groups are defined at the Account level.
Affinity Groups can be attached to Instances when they are created. Affinity Groups can also be changed on Instances from existing Instances, but the Instance must be stopped before the Affinity Group can be changed.
Create New Group
- In OpenCloud, click on
Computeand thenAffinity Groups. - Click on
Add new Affinity Group - A dialog box will pop up. Fill out the name of the group, the description, and then the type.
Add during Instance Creation
- During Instance creation, one of the advanced options is to assign an Instance to an Affinity Group. Entering the
Advanced Optionsmenu will allow the Instance to be added to the Affinity Group upon completion. - Once the Instance is created, it will belong to the Affinity Group assigned to it.
- The Instance will show what affinity group it belongs to in the Instance details.
Add/Change Existing Instances
To use new Affinity Groups on existing instances, the instance must be stopped first.
- In OpenCloud, click on
Computeand thenInstances - Click on the Instance name to go into the Instance details.
- On the Instance menu screen, select the
Stop Instancebutton. - A dialog box will come up asking to confirm. Clicking OK will start the process.
- Once the Instance is shut down, the option
Change Affinitywill appear on the list of options in the upper right. - Click on this button to bring up a list of affinity groups. Select the one that should be added to the Instance and click Ok.
- Once the Affinity Group has been set, the Instance will reflect that new assignment.
- The Instance can then be started again.
View Members
- In OpenCloud, click on
Computeand thenAffinity Groups. - Click on the Affinity Group name to bring up its details.
- Inside of the Affinity Group window, click on
View Instancesto see what instances are assigned to the rule.
Delete Group
- In OpenCloud, click on
Computeand thenAffinity Groups. - Select the group to delete by clicking the box next to the group name and then click on the red “Delete” button.
- A dialog window will pop up asking for confirmation. Click OK.
- All Instances associated with this affinity group will be disassociated after it is deleted.
Usage
OpenCloud tracks resource consumption across Instances, Volumes, Networks, and other resources. Usage records are viewable directly in the UI under Tools > Usage.
Usage records show the resource type, the account it belongs to, the start and end time of consumption, and the offering associated with it. This is useful for auditing resource utilization across accounts and domains.
Note
Usage data is updated periodically and may not reflect real-time consumption.
Webhooks
Webhooks allow OpenCloud to send real-time event notifications to an external URL when specific events occur, such as an Instance being created, stopped, or destroyed.
Add a Webhook
- In OpenCloud, click on
Tools>Webhooks. - Click
Add Webhook. -
Fill in the required fields:
Field Description Name A friendly name for the webhook URL The external endpoint that will receive the event payload Secret Key Optional. Used to sign the payload so the receiving system can verify it came from OpenCloud. SSL Verification Enable to verify the SSL certificate of the target URL. Disable only for self-signed certificate endpoints. -
Click
OK. The webhook will begin receiving events immediately.
Manage Webhooks
- In OpenCloud, click on
Tools>Webhooks. - Click on the webhook name to view its details, including delivery history and recent payloads.
- Use the
Editbutton to update the webhook configuration. - Use the
Deletebutton to remove the webhook.
!!! note “Event Payload Format” Webhook payloads are delivered as JSON via HTTP POST. The payload contains the event type, the resource affected, and relevant metadata.